Monday, 24 October 2011

Week 4

Week 4 has been a tough development and learning process for the rigging area of the pipeline. It has been the first time I have ever tried to rig and it should NEVER EVER be underestimated. From what I have gathered about the rigging process, it is that crucial period in which the outcome of the rig depends on your skills as a modeller and consequently influence the animation process and so on. On a note of workflow I have learnt a few valuable lessons about how the rigging process fits into the whole pipeline of game production and how choosing the right time to rig your model can be crucial to the entire process.


First I will talk about what I have learnt about the process of rigging and then I'll go on to the workflow process of rigging. 


Rigging is the process in which (game) assets that require animation are given what is effectively a virtual skeleton in order to allow the animator to easily and realistically manipulate the asset. Rigging is mostly used for characters as they require an efficient method of manipulation without letting the scene file get too messy. In this case I will be mainly talking about rigging a character although rigs can be created for any asset that needs manipulating for example a crane would require a rig if it were to be animated (although its not compulsory it would definitely speed up the workflow which is crucial). 


For a humanoid character we must first look into the bio-mechanics of the human body.... This effectively means how we move in fancy words. The adult human skeleton has 206 bones and although we don't need to understand what every single bone does (unless you are animating for medical science uses) we do need a general understanding of certain key bones and their limitations so we can mimic this in our rigs as realistically as possible.


An example of how bio-mechanics can influence the rigging process can be explained with this page from the book The complete Idiots guide to Anatomy & Physiology by Michael Lazaroff (2004). On this page it explains how the human skeleton is essentially 2 skeletons within 1. The first being the axial skeleton which is composed of the skull and the spine; the second part of the skeleton is the appendicular skeleton which is composed of the arms and pelvis through to the legs. The reason they are classed as 2 different skeletons is because they are believed to have evolved separately to one another. Biology aside, the reason we can look at this in terms of rigging is because I now posses better understanding of the skeleton and when I rig my character I now know to create the different joint hierarchies separately up until a certain point. This allows me to give my undivided attention to certain areas of the rig to achieve maximum realism and when I am satisfied I move on to the next bit.  This is also an example of a systematic workflow in which the chances of messing up the entire rig is reduced.  



The other valuable lesson to be learnt from bio-mechanics is the different types of joints that exist within the human body and where these joints would be. Above is the same book which explains the different types of joints both visually and text explanations. This is important to keep in mind, particularly when creating controllers for the rig as every joint within the human body will have its limitations. For example the shoulder joint which is a ball and socket joint will allow rotation all the way around in certain axis as well as movement towards and away from the body however it will have limitations in movement for example cannot do the same movement as say a knee joint. 


This explains the function of the shoulder joint movements and so by using this knowledge I can constrain my rig correctly to mimic the human skeleton as accurately as possible. A few other pointers I have picked up whilst working through the rigging process.


The Local rotation axis for FK should have the axis match the world axis as closely as possible.


The Local rotation axis for IK should have the x axis pointing towards the child joint.


The use of referencing when creating the rig allows you to do the final tweaks to the modelling while the rig is being created. 


Organising files is key to an efficient workflow.


Systematic workflow I found on a forum from a games designer:


Design:
1. We write down/ sketch the basic game concept on paper and pin it somewhere. (this is better done up-front as it will help you with level and asset creation). 
2. We then start filling out stuff we've missed and pin it again. (this is a continuous process)
3. Our concept/ level design artist starts sketching the first levels and the props that we'll need.

Assets:
4. I usually start with modeling the low-poly prop cages in 3ds max.
5. We test the unwrapped/ untextured props in a level mock-up.
6. We tweak the low-poly versions to fit our level design (scale, alignment, pivots, etc)
7. I unwrap all the assets.
8. I prepare those that need normal maps for mudbox/ zbrush. (drop an edit poly on the stack and optimize polygon density and hard edges)
9. I export the unwrapped models and paint the base textures using Mudbox and Photoshop.
10. We do another dry run with the basic textures.
11. Detail texture pass. (Or mudbox sculpting/ exporting/ normal map baking pass)
12. Beta Level (or level module) assembly.
13 Test again.
14 Final tweaks
15 Final level assembly.
16 Final test.
(despite their titles, the last 3 steps will usually be repeated a few times)

If you don't have a dedicated programmer working on the mechanics while you create the assets, you're better off coding your basic gameplay elements between step 6 and 7. This way, you're not going to waste so much time with assets that might not be needed due to your gameplay mechanics.

Also, when starting on a level we usually pick the most complex module (a room or a part of the map/ zone) and do that first, just to pin the atmosphere down and check if the props we've planned will suffice or fit together nicely. Once done, we move on to the rest of the level.

Once we complete a level, we play test it (extensively) and usually abuse the Combine scripts and the "Delete key" untill everything performs as it needs to.

17. Material tweaks (AO and so on)
18 Second unwrap pass (channel 2) and lightmap baking. We usually do this on groups (based on object proximity) and we try to avoid Flatten Mapping as much as possible.
19. Beer, rinse, repeat from #2.

P.S: we've tried other workflows and ways to do this, but this fits our now 3 manned team (down from 5) perfectly.


Monday, 17 October 2011

Week 3

Week 3 has been a very steep learning curve in terms of both Maya and the pressures of working to a deadline. I'll start with the Maya first; I wanted to start this week by allowing myself the first two days to create a low poly character that I could go on to texture and rig by the end of the week. Considering I did not really understand texturing at all and the only model I had ever rigged was the hand from last week I realised this was quite a daunting task ahead of me and decided to break up my available working days into 2 day periods in which I could focus on modelling for Monday and Tuesday, texturing for Wednesday and Thursday and rigging on Saturday and Sunday.

To help me with modelling the character I needed abit more learning resource and so I looked at a few online tutorials and found this one particularly useful. Combining this tutorial with what I had learnt last week I managed to quickly model a female character without the head and hands by the end of Monday in the space of about 8-9 hours.
http://www.creativecrash.com/maya/tutorials/character/c/real-time-character-modeling-tutorial
I felt much more comfortable with the modelling tools in Maya and I feel as though I have developed a further understanding into modelling systematically for example going from a block stage model to achieving a roughed out figure to working in the details and I felt that many tools such as the Insert edge loop and Split polygon tool (Known as Interactive Split tool in Maya 2012) can help model effectively when its uses are understood within 3D space. I wanted to focus more on the modelling aspect as opposed to character design which is why I based my model off an accurately proportional sketch of a woman.


From 2D (above) to 3D (below)


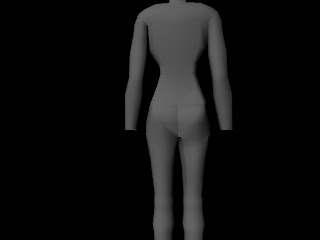
These images show my Female model from different profiles. By the shapes and characteristics I would definately say that as an audience you can tell it is a female which I confirmed by asking various people again Via Facebook. A few critical points I have to say for the model:


  • The waistline goes unnaturally thin as it approaches the navel area and needs to be a more rounded and smooth curve.
  • The backside area needs more definition and again a more rounded and smooth outcome.
  • The thighs in comparism to the knees do not have enough difference in broadness and generally the thigh area needs greater definition. 
  • The breasts are too large and when compared to the hips makes the model unnatural.
  • The shoulders are too broad and need to be narrowed to give her a more feminine look.
On the plus side however.... she DOES look like a woman so overall I do have to say it has been a good attempt and with only 1600 tris its a good start to creating a low poly model. In terms of the topology of the model although it does look pretty symmetrical and fairly even there are areas that need improvement or atleast more consideration when it comes to remodelling next time. 


Here is a few low poly models used for a MMO called Allods online which was posted on a forum by one of the artists. http://www.polycount.com/forum/showthread.php?t=74450


These models range between 3000 - 6000 Tri's yet they hold so much form and detail. This is something I believe is achievable for my own project and all the texture/shadow/detail is all simply 1 texture map with all of it painted onto one file in photoshop in seperate layers, no spec maps etc.

Which leads me on to Wednesday - Thursday which I focused soley on texturing. Texturing is the one process that I really found difficult and very hard to get my head around which is strange and I come from a textile manufacturing family background however its not quite the same I suppose in 3D software however there are theoretical similarities such as knowing where to put seams and were to sew the UV edges. Pre-Wednesday I also did not understand what a UV was entirely so I did some research online and found a great definition.


'This process projects a texture map onto a 3D object. The letters "U" and "V" are used to describe the 2D mesh because "X", "Y" and "Z" are already used to describe the 3D object in model space.
UV texturing permits polygons that make up a 3D object to be painted with color from an image. The image is called a UV texture map, but it's just an ordinary image. The UV mapping process involves assigning pixels in the image to surface mappings on the polygon, usually done by "programmatically" copying a triangle shaped piece of the image map and pasting it onto a triangle on the object. UV is the alternative to XY, it only maps into a texture space rather than into the geometric space of the object. But the rendering computation uses the UV texture coordinates to determine how to paint the three dimensional surface.' (www.wikipedia.org) Thanks wiki :)

With my head now around what a UV was I could then go on to the mapping the UV's on my model. This was a painstakingly long process and took the combined effort of book and online tutorials as well as a lot of trial and error. 
 When I finally did manage to unwrap my UV edges successfully in the UV Texture editor I found that too many seams in the texture would make it difficult to match up all the edges correctly by the colours and it was likely to show up when rendering, particularly if the seams ran through the middle of the model. 
 Thinking about the positioning of the seams is important and I think that for future projects I should definately bear this in mind when modelling or even designing the character however I did learn there are a few tools that can help you avoid this. 
One of these tools being the Sew Uv edges which cuts down the number of seams therefore allowing a cleaner texture. 

My final learning curve of this week was not so much something I had learnt in Maya but rather a practical issue. It is vital to save important work to 2 separate locations just in case one file becomes corrupted and also its good to keep hardware running as smoothly as possible i.e laptop as mine crashed and was out of commission for 4 days which really pushed me back on my schedule. This coming week I will focus solely on the rigging process and how the research of anatomy can help me achieve greater and more realistic rigs. 

Monday, 10 October 2011

Week 2

Week 2 saw alot of modelling practice. This was done from tutorials in a book called Maya for Games by Michael Ingrassia. I feel that the modelling practice really helped me grasp the concept of modelling within 3d space and it helped me get more comfortable with using the perspective view when modelling as opposed to the orthographic viewpoints. I also modelled my first human hand, head and body and really managed to understand the whole process alot better. 


This tutorial taught me how to use new tools within maya such as Blend shape and how that can help model which is how I modelled the fingers. I then went on to create a basic rig for the hand. 


(I apologise for the pose if it offends you but I thought it was hilarious) This basic rig was created using the Joint tool and then the mesh was attached using the Bind skin tool. The only problem I found with this was that when I moved the rig around the mesh deformed at certain points. I found out that this was because I had to paint the skin weights on the vertices by hand which is something I will bear in mind next time. 


Toby Rutter - 'its likely just a skinning problem, you need to paint weights per vertex telling maya which verts to move when a particular joint moves'


Above is the face I modelled again based off the tutorial. I found this tutorial extremely useful as it gave me an insight into how to model a face and how and where to start as I had no clue previous to this tutorial. Some feedback I received about this head from my fellow peers. 

Matt Hart Pretty good for a first :) the nose goes mega thin towards the top tho, lips are done well.

I found that Facebook is an extremely useful tool for getting feedback from fellow peers and so I will continue to post my work via Facebook aswell to gain this valuable feedback.

Modelling this head gave me the confidence to go on and model my own head without a tutorial so using some images I found on Google Images I managed to create this....


I would like to further work on this model once I have got abit more confident with modelling and I hope to model the body aswell to create a full 3D Darth Vader. 

(Great link to the visual development of Darth Vader which I found very useful and also very interesting)

I did model a low poly body for the soldier which gave me a great understanding how to model a body using reference images such as a character sheet. 

The plan for week 3:

  • Monday & Tuesday  - Model a low poly human (Not sure if i'm going to do a male or female)
  • Wednesday & Thursday - Research texturing and create simple textures for low poly assets.
  • Saturday & Sunday - Rig the low poly human and research rigging methods.
Next Monday I will post the review for the week.

Time to get organised....

For my specialist study 1 I have decided to go with a project that focuses on the entire process of game creation as opposed to having a next gen finished outcome. The reason I want to do this is because time management has always been a downside in every project I have ever done but this project I really want to push myself and maximise the time I have effectively. I also think this project is a perfect opportunity to speed up my skills whilst adhering to a good quality of work.

My learning outcomes from this project:


  • To be able to model assets effectively and efficiently within the limitations of the game engine.
  • To understand basic texturing techniques.
  • To be able to create simplistic rigs in order to animate the asset. 
  • To be able to refine animation to achieve realistic and believable movement.
  • To gain understanding of game engine basic functionality such as importing assets correctly and even applying basic coding. 
Now anyone who has experience in 3D will appreciate that this is a lot of work, especially as I have only basic knowledge of 2 areas and no knowledge of 2. The other factor within my project is that the clock is constantly ticking and like the professional industry I too have a strict deadline to stick with. This means that my working method has to adapt and be able to handle the vast amount of practical work in the time I have. In order to do this I must develop weekly plans and then break these plans down into daily tasks. Mondays will be the review days where I reflect upon the previous week and focus on the tasks for the following week. 


This is one way that will help me manage my time effectively. 

Thursday, 6 October 2011

New year.... New challenges... Specialist Study 1

With the final year now beginning I have to really push what I have learnt over the last two years and apply it to a professional practice. Having reviewed and reflected on the last two years I feel that my route lies within the games pathway and for my specialist study I would like to pursue a game orientated project.

Why games????


So the question remains why the games industry? Below is an article from the TIGA website about the current state of the UK games industry which may provide some insight into why the games industry is the place to be in right now and definately for years to come. TIGA are the official governing body representing the games industry within the UK and even hold seats within Parliment to secure the best interests of the industry.


'The UK video games industry is the largest in Europe and the UK is a world class location for video game development. The UK boasts a substantial and highly qualified talent pool, some of the finest video games studios globally, technical as well as creative excellence, an ongoing ability to generate products that sell well globally and to create original video games IP. The UK is home to the studios that have developed video games such as Grand Theft Auto IV (the fastest selling entertainment product of all time), Runescape, the Fable series, Broken Sword and LittleBigPlanet.

The video game sector offers opportunities for growth and high value, high technology job creation for the UK. Estimates from PWC suggest that the global market for video games will grow from $52.5 billion in 2009 to $86.8 billion in 2014. TIGA’s ambition is to make the UK the best place in the world to do games business and so enable the UK games industry and the UK economy to secure a growing share of this huge market. 

The UK games development sector contributes approximately £1 billion to UK Gross Domestic Product  per annum. 

The UK games industry employs 9,000 highly skilled development staff, 85 per cent of whom are employed outside of London. 80 per cent of the workforce in game studios such as Blitz, Climax, Exient, Jagex, Kuju Entertainment, Rebellion and Ubisoft Reflections are qualified to degree level or above.   

The UK game development sector is R&D intensive. Two fifths of UK game developers have a budget dedicated to R&D. UK game developers spend on average 20 per cent of turnover on R&D.   

UK game developers are export focused. 95 per cent of UK game businesses export at least some of their games/services to overseas markets. On average, 45 per cent of a UK games business’s turnover is generated from the export of games.   

The video games sector is also low carbon in output. Most of the work in games development involves design on computers, the packaging in games is minimal and box products are relatively light to manufacture and to transport. In the future, video games will become even more low carbon in nature as the industry moves towards digital distribution.

' - (www.tiga.org)


So there's alot of figures and stats above and alot of factual information relating to the games industry within the UK but it is NOT why I as a person want to pursue this career pathway (although it is still relevant). Games for me represent our ability to create interactive escapism and it allows us to put reality on hold and dive into a world that is only limited by the imaginations of the brilliant people who create these games. I too want to be able to create something that as unlikely as it sounds in the real world, it can be achieved through a game and will still be believable to all those that immerse themselves within it. Games have always played a pivotal role within my life and have in some ways defined me as a person and so I want to be able to do that for other people an let them experience what I have felt growing up playing games.


Trailer for Gears of War 3


Trailer for Assasins Creed Revelations


Trailer for Battlefield 3

With technology advancing every single day the games of today are really pushing the boundaries and giving the audiences experiences that previously would've just sounded plain crazy. In an industry that pushes forward every single day breaking down the barrier between movies and games you really need to know your stuff so for me to start pushing towards it I really need to step up my game and hopefully this project will aid me in my ambitions.

My aim is to develop and create a playable games character within the constraints of a deadline.